How to Unlock Bootloader on any Lenovo Smartphone

How to Unlock Bootloader on any Lenovo Smartphone
Lenovo is recognized for manufacturing high-quality computers and smartphones/tablets that provide an excellent user experience. Lenovo smartphones and tablets come pre-installed with the ZUI skin, which does not allow users to personalize anything. As a result, interested consumers opt for third-party firmware or root access on their Lenovo handsets. In this article, we’ll show you how to unlock the bootloader on any Lenovo smartphone in 2021.
When it comes to Android device modifications, it’s worth noting that the bootloader unlocking process is the first and most crucial. Without bootloader unlocking, there is no other valid and effective way to configure your Android smartphone from the root level. Fortunately, Lenovo provides an official method for unlocking the bootloader on its smartphones and tablets that does not require the use of any third-party programs or procedures.
You’ll be able to simply install custom recoveries like TWRP, flash third-party ROMs like LineageOS, enable root access, install custom modules, and more after you unlock the bootloader on any of your Lenovo smartphones or tablets. That’s why, if you want to root or install custom firmware on your Lenovo smartphone, you’ll need to unlock the bootloader first.
Table of Contents
Overview of Bootloader Unlocking
Every smartphone and tablet OEM (maker) provides a locked bootloader by default as a security/privacy protection to ensure that user data is not easily exposed. However, because Android OS is open-source and allows for endless tweaks, interested consumers are constantly eager to explore all of the customization options. As a result, they begin the bootloader unlocking and other customizing procedures.
A bootloader is a software or hardware-level code that operates the device based on the user’s input, whether the device is in system or recovery mode. To summarize, a locked bootloader will prevent all third-party flash or image files since it only processes signed objects from the manufacturer to safeguard the device’s health from security threats.
Once you’ve unlocked the bootloader, it won’t run through any of the essential security checks, allowing you to quickly flash additional third-party files into the system and boot partitions. It goes without saying that if you wish to go back to the locked bootloader condition, you can. So it’s not a big deal, but you must follow all of the procedures to unlock the bootloader correctly or the device may malfunction.
In 2021, how can you unlock the bootloader on any Lenovo smartphone?
Before proceeding with the rest of the instructions, be sure you review all of the prerequisites as well as the download links provided below to guarantee a successful bootloader unlocking.
Pre-Requirements:
- To connect your Lenovo handset to the PC, you’ll need a laptop or desktop computer and a USB cord.
- To avoid occasional shutdowns throughout the process, keep your device’s battery charged to at least 50% or higher.
- Because all of your internal data will be lost, we recommend that you create a comprehensive data backup of your device (internal storage).
- Make sure you have the necessary tools or drivers installed on your computer.
The following are the download links:
Warning:
The manufacturer’s warranty will be invalidated if the device bootloader is unlocked (if applicable). If your gadget is under warranty, it’s best to verify the manufacturer’s conditions before doing anything. Dubaexpress will not be held liable for any bricking or damage to your phone that occurs during or after completing this process. As a result, proceed at your own risk.
Please keep in mind that unlocking the bootloader wipes all of your device’s internal data. As a result, make a backup first.
How to Unlock the Bootloader Using ADB and Fastboot
- Navigate to the Lenovo device’s Settings menu.
- Tap on System at the bottom of the page.
- Scroll to the bottom of the page by tapping on About Phone.
- Tap on IMEI Information, and you’ll see your device’s IMEI 1 and 2.
- Manually write down the IMEI 1 someplace else. [Important]
- Return to the previous page and select Status from the drop-down menu.
- The Serial Number for your specific device model may be found here. Make a note of it as well. [Important]
- Return to the About Phone page once more > To activate Developer options, tap on Lenovo version 7 times in a row.
- Return to the main Settings page and select General Settings from the drop-down menu.
- Go to Developer Preferences > To confirm, turn on the OEM Unlocking option and choose Enable.
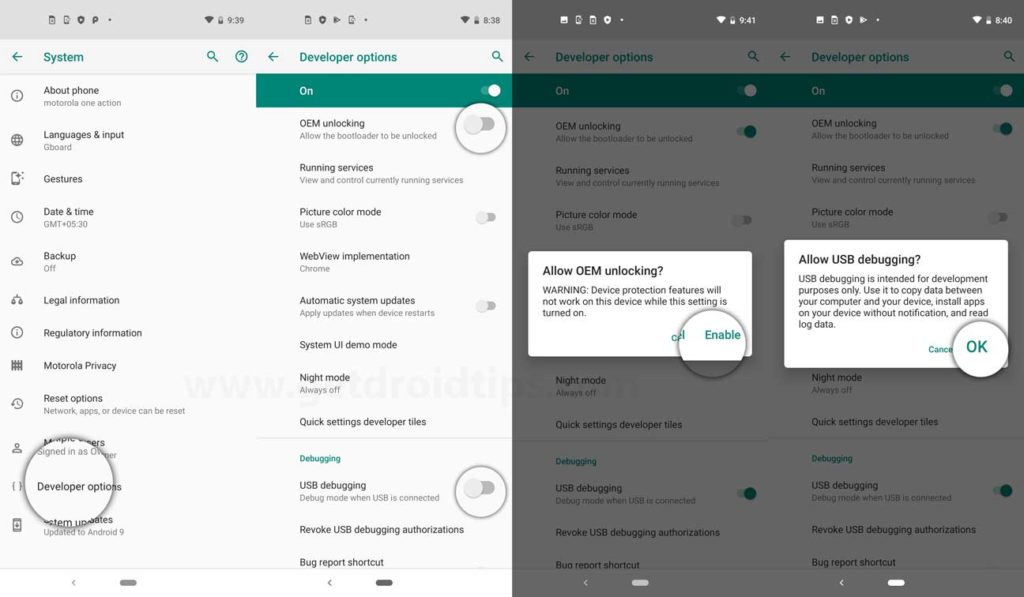
- Scroll down to the USB Debugging toggle and switch it on > Tap OK to confirm.
- Now, using your mobile device or computer, go to the official Lenovo ZUI Unlock page by clicking on this link.
- If you don’t understand Chinese, translate the page into English.
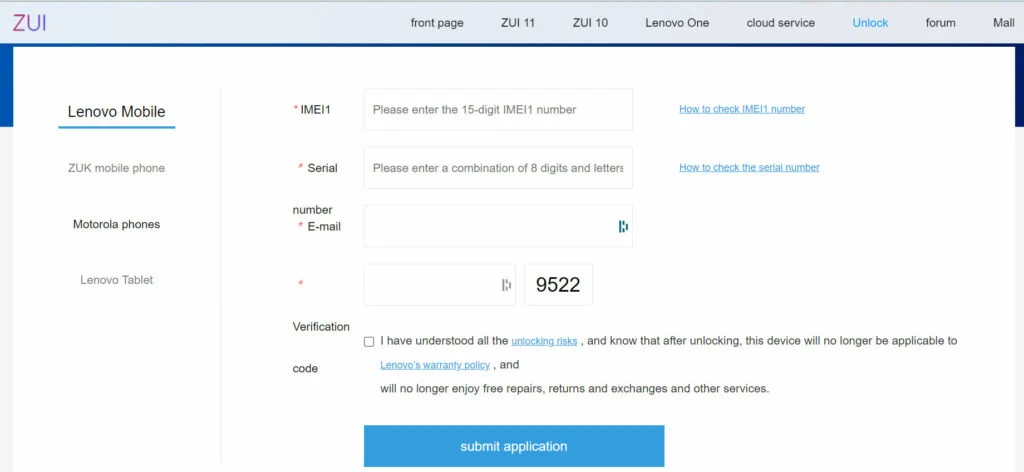
- You may pick from a variety of settings here, such as the device section you’re using. Lenovo Mobile, ZUK Mobile, Motorola Devices, and Lenovo Tablet are just a few examples.
- So, click to choose your device section > Now, fill in all of the required information, including the IMEI number, serial number, e-mail address, security code, and terms and conditions.
Note: You must provide a valid email address in order to get the unlock file for your device, which is required.
- When you’re finished, click the blue Submit Application button.
- You’ll now get an email with the SN image (sn.img) attached. So, go ahead and check your mailbox for that file and download it.
- On your computer, unzip the ADB Fastboot zip file.
- Connect your Lenovo gadget to your computer with a USB cord.
- Next, copy/move the sn.img file to a new folder on any disk.
- To access the context menu, hold down the Shift key when right-clicking anywhere inside the folder.
- Select the Launch PowerShell window here option to open a command prompt.
- To see if your device is linked to the ADB mode, type the following command and press Enter:
adb devises
- If a pop-up prompt appears on the device asking you to allow USB debugging, choose Always from this computer and then Allow.
- You’ll see a random code on the command prompt screen if it’s connected in ADB mode.
- To boot your device in fastboot mode, use the following command:
adb reboot bootloader
- Your Lenovo device will boot into fastboot mode in a matter of seconds.
- To flash the sn.image unlock file on your device, perform the following command:
fastboot flash unlock sn.img
- You’ll notice the Finished message on the command prompt window after it’s finished.
- Then, to validate that your device’s bootloader has been unlocked, execute the following command:
fastboot oem unlock-go
- Your Lenovo gadget will now boot into the operating system automatically.
- You’ll have to wait for the gadget to fully boot. It can take some time, so be patient.
- Complete the basic setup procedure when the device has booted into the system.
- As we did previously, make sure to activate USB Debugging from the Developer settings menu once more.
- Connect the handset to the PC with the USB cord once more.
- Reopen the command prompt using the same techniques as before and run the following command:
adb gadgets
- If a pop-up prompt appears on the device asking you to allow USB debugging, choose Always from this computer and then Allow.
- Run the following command to boot your device in fastboot mode once the linked adb device displays a random code:
adb reboot bootloader
- Now you’ll notice DEVICE STATE – unlocked, which signifies your device’s bootloader has finally been unlocked.
- Finally, to restart your device in the system, use the following command:
fastboot reboot
- Wait for your device to re-boot into the operating system. It could take a while.
- Enjoy!
That’s all there is to it, guys. We hope you found this information useful. You can leave a comment below if you have any more questions.
Lucas Noah, a distinguished writer with a Bachelor of Information Technology (BIT) degree, is currently making waves in the digital content sphere with his contributions to Creative Outrank LLC and Oceana Express LLC. His work on their websites showcases hi... Read more