How to Use Odin to Manually Update Your Samsung Phone

Figure of Samsung Phone
Samsung Phone: As the head of the Norse pantheon, Odin, the All-Father, lords over Asgard. To flash firmware images to Android-based smartphones and tablets, users use Odin, a piece of Windows software Samsung internally released. It’s critical to distinguish between the two.
Unlike Google and some other phone makers, Samsung maintains strict control over its software, using bootloaders and locked firmware to prevent users from installing custom ROMs and performing other modifications. Therefore, installing both official and homemade software on a Samsung phone is frequently made simple by Odin. So turn on your copy of Thor, and let’s begin.
Table of Contents
What you’ll require
Thankfully, other than the Odin software itself which we’ll get to you just need a few things for this:
- a Samsung tablet or phone
- A Windows desktop or laptop
- a USB cord
Describe Odin
Samsung’s Android-based devices can automate while updating firmware using the Windows-based application Odin. The tool design for Samsung’s own staff and authorized repair facilities; is not intended for customers. In order to help customers fix or configure their devices, all of the versions of Odin that have leaked online are posted to enthusiast websites and user forums.
The purpose of utilizing Odin is to load bootable files into the device because it is official Samsung software, which the phone or tablet recognizes as permitted. Although some Samsung smartphones can be modified or rooted without it, many procedures and fixes demand its use.
Having said that, take special attention because using Odin on your own could result in the bricking of your phone. Many Android enthusiasts have used it without incident, however, there is a potential that the phone won’t be able to boot again if you load the incorrect firmware file or stop the flashing process. Additionally, it’s possible that installing the Odin program will void your warranty even if you return your phone to Samsung for a more formal fix.
Step 1: Select the appropriate Odin version
You must first locate and download Odin before using it. That does seem rather clear, but it’s harder said than done. You’ll need to locate a version hosted by a third party because Odin isn’t issued by Samsung for public distribution, as was already indicated. User forums frequently link to them, with XDA Developers being the most popular. There are sections on this enormous website for practically every popular Android device.
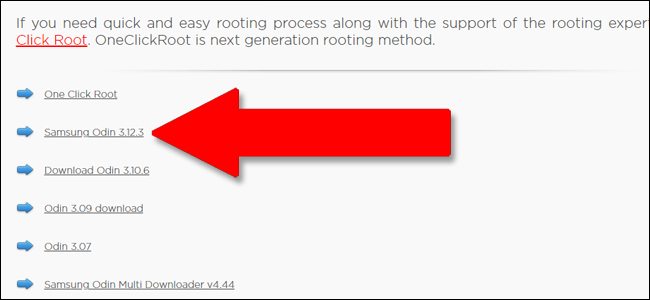
The most recent version of Odin that Samsung customers have access to as of this writing is 3.12. Since none of them are genuinely legitimate, we are hesitant to endorse any particular download sites, however, OdinDownload has historically provided us with decent results. However, as always, make sure you have a reliable antivirus and antimalware program installed before downloading software from untrusted sources.
If the Odin installer is in a compressed folder, download it to your Windows computer and unzip it. Since the software is portable, installation is not necessary.
Locate An Odin-Flashable Firmware File in Step Two
You presumably wanted Odin for this reason in the first place. Odin files come in a variety of sizes, from the massive multi-gigabyte firmware files that make up an Android phone’s core operating system to tiny upgrades for other critical components like the bootloader or radio. Odin is typically used to flash standard, unaltered software images or slightly modified ones that include extra features like root access.
Once more, the primary distributors of these files are user-oriented websites like XDA. The typical procedure for users is to locate the software, upload it to a file hosting service like AndroidFileHost, and then create a new forum post announcing it and including a link to the hosting site. Another crucial purpose of these postings is to enable you to confirm that the file you’re using is indeed compatible with your device.
Before selecting a file to download and flash, you need to look for a few things:
Device compatibility: Verify that the file design is to flash on the particular device and device variant that you are using. Different “Samsung Galaxy S8” smartphones exist Processor, radio, and other hardware variances might cause minor or significant regional disparities. To make sure, verify the complete model number. And you probably shouldn’t flash if you’re unsure.
Carrier compatibility: While some Samsung phone models can use with numerous carriers, some are only compatible with a few. As a result, some firmware is incompatible with specific phones. Once more, you can probably determine this based on the model number of your phone.
Blocks that prevent downgrading: If a software upgrade is extremely substantial, it might not be able to flash the phone’s firmware back to an earlier version. Checking other users’ reports is essentially the only method to learn this. If you’re trying to downgrade the program, go through a number of pertinent posts before moving on to the next stage.
Odin compatibility: You might need to wait for the most recent version of the Odin application to leak before continuing because older versions may not be able to flash the newest firmware files.
Connect your phone or tablet in the third step
Start your phone in “Download mode” after turning it off. This unique pre-boot mode gets the device ready to flash new software. A certain button combination must press in order to enter this mode; for older Samsung phones, this was frequently Power+Home+Volume Down, held for five seconds. Power+Bixby button+Volume Down on the Galaxy S8 and Note 8 series is the combination. You can find the combination you require for your unique model by performing a fast Google search.
Keep in mind that “Download mode” only applies to Samsung smartphones and is distinct from “Recovery mode,” which can access by all Android devices. The button combinations on your phone or tablet will be different for each. Although they will appear to be the same, download mode is nothing more than a screen where the phone waits for input via USB, whereas recovery mode typically has a few user-accessible options in a list.
Using Odin For the Flash in the fourth step
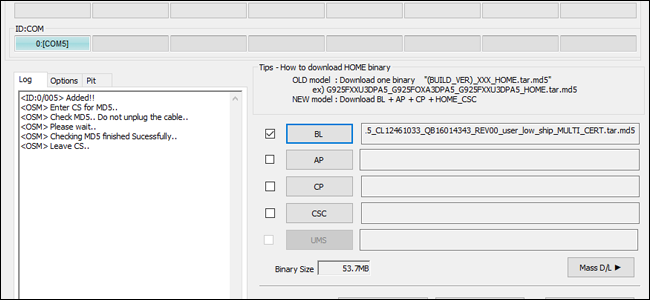
Open the Odin application when your phone or tablet connects to your computer. In the most recent version, the ID: COM field should have one item, which is colored teal, and an “Added!!” message should appear in the Log part of the user interface. You might need to look for a Samsung driver for your phone if you can’t see this.
You have a variety of options at this stage. You will be pressing each of the following buttons to perform a full stock ROM flash:
- The bootloader file is BL.
- AP: The main operating system file is called “Android partition.”
- The modem firmware is CP.
Consumer Software Customization (CSC): An additional partition for carrier and regional data
Toggle each button’s associated choice by clicking it. ROM or other software that you downloaded in Step Two’s md5 file. Your package might not contain all four file kinds, depending on the specifics of what you’re doing. In that case, disregard it. Make careful you place the appropriate file in the appropriate field. Each loaded file will have a checkmark next to it. Larger files, particularly “AP,” may cause the software to halt for a minute or two as it loads the file.
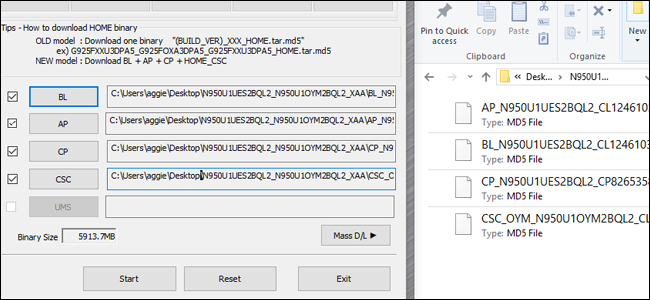
Depending on whether you’re flashing a stock ROM, a fresh bootloader or modem file, etc., this part of the process can vary greatly. For specific instructions on how to proceed, go to the file’s instructions found in the article from which you obtained it. Do not continue if you are unsure of which md5 file belongs where.
Clicking the “Start” button will start the flashing procedure if everything is in order. All that data may travel slowly, especially if you’re using USB 2.0 to connect. In the “Log” or “Message” field, the files will flash over, and a progress meter will show up close to the ID: COM area.
When it’s done, a “RESET” button will show up above ID: COM. When you click it, your phone reboots and loads the new software. Congratulations!
The actions listed above are general. If the instructions given for your particular device and flashing software differ from those provided, feel free to adjust the method, especially if you’re attempting to flash a customized version of the phone’s software that didn’t originate from Samsung.
FAQ
How can I force an update on my Samsung?
Checking for an OTA update allows you to manually update Android. Use the methods listed below to check your Android device’s OTA update. Navigate to your device’s Settings, then select About Phone. Next, depending on the manufacturer, select Software Update or System Update.
How can I force a Samsung update?
You can manually update Android by looking for an OTA update. To check for OTA updates on your Android smartphone, use the methods given below. Select “About Phone” from the Settings menu on your device. Select either a System Update or Software Update option, depending on the manufacturer.
Can I upgrade my Android phone manually?
Here’s how to upgrade an Android device forcibly. Tap on Apps under Settings on your Android smartphone. Next, select Show System from the drop-down option by tapping the three dots at the top of the screen. Find and choose Google Services Framework from the list of choices by scrolling through them.
Why isn’t the software on my Samsung phone updating?
Your Wi-Fi connection, battery life, available storage, or the age of your device could all be contributing factors if your Android device won’t update. Updates for Android mobile devices often happen automatically, but for a variety of reasons, they may postpone or even halt.
How do I use my computer to update my phone?
Utilize the USB cord that comes with your device to connect it to your computer. In the Device list, right-click on your device and choose Update Firmware from the menu. Observe the directions. The updating is automatic.
Editor’s Choice
How To Root Samsung Galaxy J7 SM-G6100
How to Root Samsung Galaxy J7 SM-J700K
How to Root Samsung Galaxy J1 ace SM-J111F