A Guide to Epoxy Flooring Installation in a Garage

Figure of Epoxy Flooring
Epoxy Flooring: Concrete floors in garages, basements, sunrooms and patios can update, revitalize, and protecte with epoxy floor coating, a two-part mixture of resins and hardeners. Epoxy coatings, when applied in several layers, produce seamless flooring that can withstand chemicals, moisture, grease, and scuffing. Firmly adhere to concrete and are less likely than standard garage floor paints to chip or peel.
Firstly, Coated floors are a good option for garages and basement offices due to their durability and non-flammability. They can support the weight of rolling and parked cars, withstand spills of every description, and withstand drop power tools. In fact, epoxy floor finishes can last up to 20 years if they install properly.

Table of Contents
How to Select the Correct Epoxy
Floor paints are durable, resin-based paints that must mix in two parts before use. Epoxy paint comes in three varieties: water-base, solvent-base, and solid.
Which is solid is the purest type of epoxy. It doesn’t contain evaporative solvents. These products are costly and challenging to use because they harden so quickly. A professional should apply this finish.
Poxy with a solvent base: These epoxies have a solid content of 40–60%. They adhere well and penetrate the concrete surface. They come in a huge variety of colors. When using the finish, you must wear a respirator because the solvents are potent and potentially dangerous. Additionally, you’ll need to ventilate the garage and keep people and animals away.
Solvent-base epoxy is similar to water-based epoxy in that both contain 40–60% solids. This type of epoxy has the advantage of not emitting dangerous solvent fumes. These epoxy finishes, which are increasingly popular replacements for solvent-based finishes, are available at most home centers and hardware stores.
Other choices for stylish flooring inside and outside living areas include pre-tinted and metallic epoxy floor coatings. When the second layer of coating apply, some epoxy floor coating systems include color flakes that scatter and leave the surface with speck patterns.
Application Guidelines for Epoxy Floor Coatings
Floor coating installation is almost as simple as painting a wall or a porch floor. However, the floor that will coate needs to meticulously clean and repaire before you start. Calculate the amount of mixture needed to completely cover the area you want to coat. Many floor epoxy kits only include enough material for one coat; you’ll need at least two. Calculate the area that needs to be coated in square footage and compare it to the coverage offered by your preferred floor epoxy kit.
Once the epoxy paint and hardener components have combine, time is of the essence because the epoxy mixture is only usable for about two hours. When deciding how to paint yourself out of a garage, patio, or room, take into account this time frame.
Potential negatives
Coatings, despite their many advantages, need a lot of surface cleaning and preparation before use, as well as multiple applications with at least 12-hour curing times between each coat. Concrete surfaces must be completely dry and at least 55°F for the best curing, and air temperatures must range from 60 to 90°F. For a garage floor, allow at least a day for preparation (more if you need to fill in holes and repair cracks in the concrete) and at least two days for painting.
According to data from HomeAdvisor, hiring someone to do the work will cost you between $3 and $12 per square foot for a professional epoxy floor installation, with an average two-car garage floor costing between $1,200 and $6,000 to complete. Ask potential contractors how they intend to prepare the floor, what kind of epoxy they’ll be using, and how many coats they’ll be applying before you hire them. Professionals are advised to apply three layers of 100% epoxy with little to no volatile organic compounds (VOCs). Obtain several quotes and check the references of the contractors.
Application of Epoxy Floor Coatings
Read the epoxy manufacturer’s instructions before you begin if you prefer to handle it yourself, and follow these detailed instructions as your roadmap.
What you’ll require
- Epoxy two-part paint
flat-edged scraper or shovel - Buying vacuum
- lawn hose
- Both a long-handled acid brush and a power scrubber with a brush attachment
- Brush with stiff bristles
- elastic squeegee
- can of plastic sprinklers
- Using a stirring bit, drill
- Paintbrushes
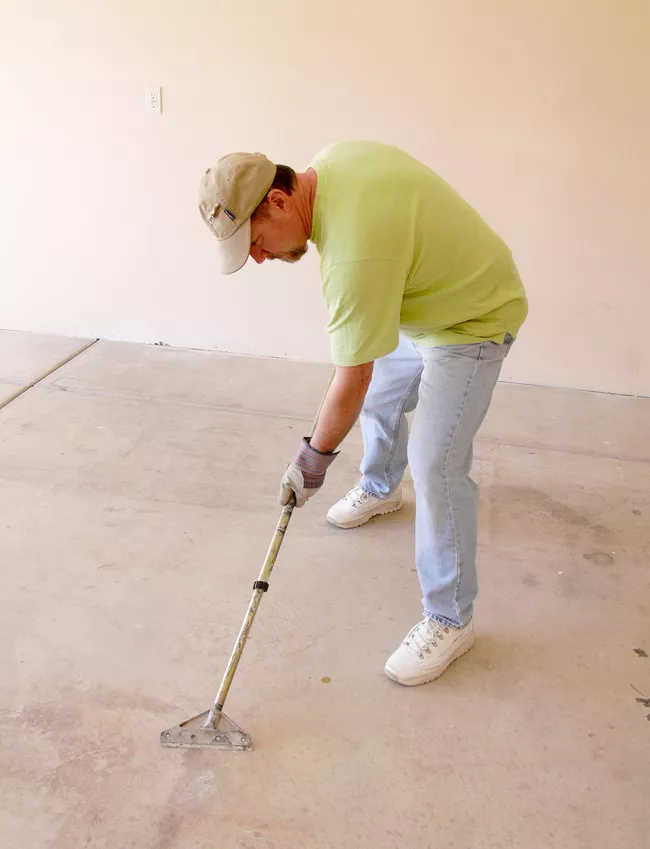
Clean the Concrete Surfaces in Step 1
To remove debris that harden, if necessary, use a flat-edged shovel or scraper. Vacuum the garage floor after that. Follow the manufacturer’s instructions when preparing a cleaning/degreasing solution. Put on rubber gloves and scrub away any grease or oil stains with a stiff-bristle brush and the solution.
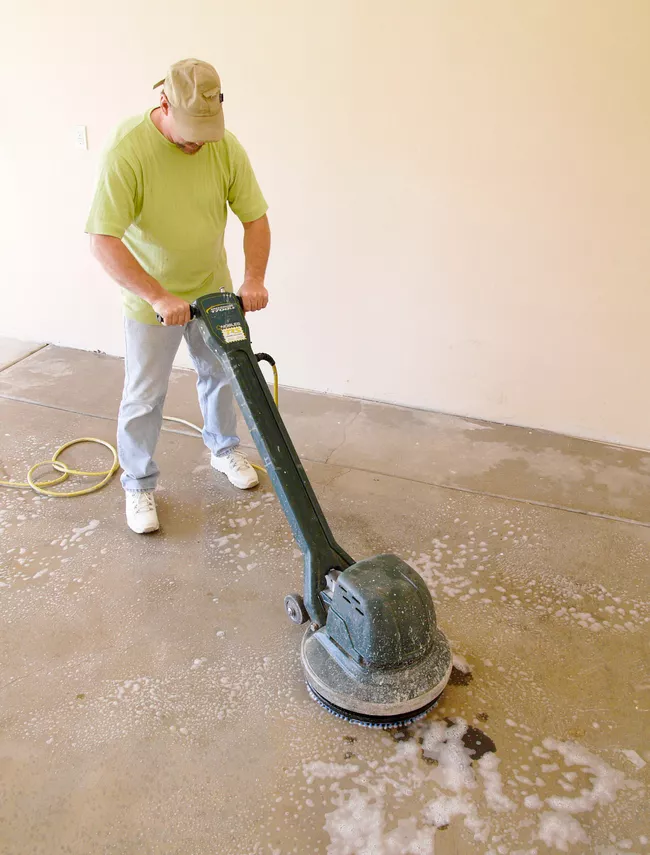
Wet Flooring in Step 2
Apply water to the entire floor with a hose. Use a power scrubber with a brush attachment and the degreaser to scrub the entire floor while working in 5-foot-square sections. Where the machine can’t reach, use the stiff-bristle brush to scrub the corners and along the walls. After the floor has been thoroughly cleaned, use a rubber squeegee to collect soapy water in the middle. Using a wet/dry vacuum, remove the solution. If you want to know if you can flush the solution down the toilet, check with your county’s environmental office.
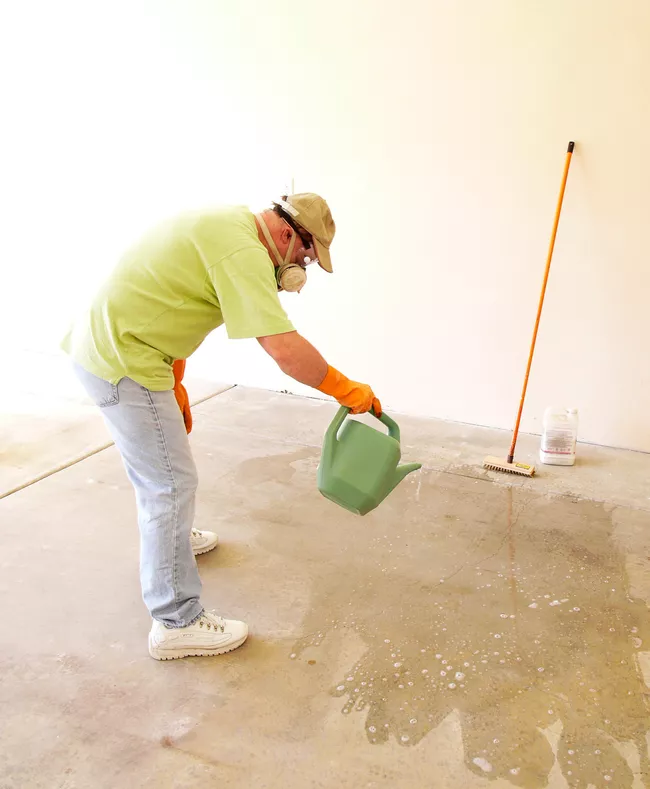
Prepare the Acid-Etching Mixture in Step 3
Fill a gallon-sized plastic sprinkler can with water. Pour 12 ounces of 32% muriatic acid into 15 cups of water while wearing a vapor respirator (for smaller or larger amounts, use 1 part acid to 10 parts water). Use a paint stirrer to quickly combine the solution. A 10×10-foot area should be evenly covered with the mixture.
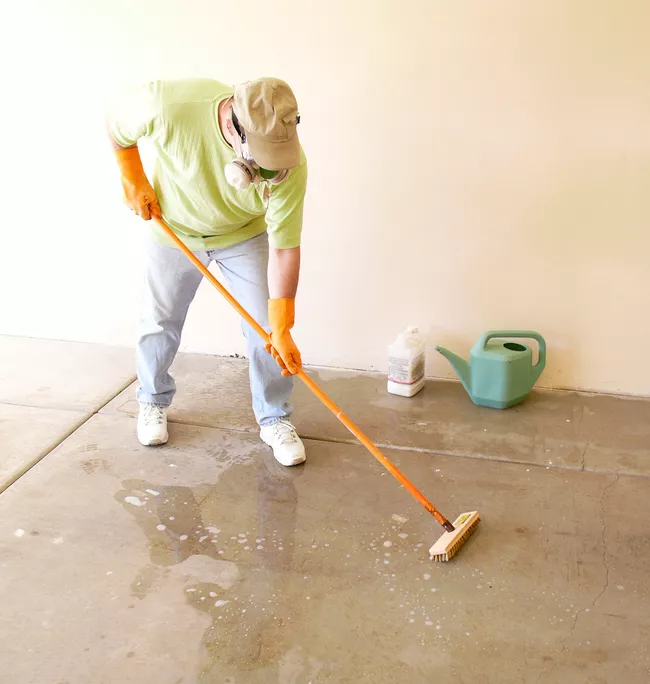
Step 4: Power-scrub
The 10 by 10-foot area for 10 minutes, or use an acid brush with a long handle (to save on equipment rental). Repetition of the sprinkling/scrubbing procedure is necessary to acid-etch the entire floor. Rinse three times to remove any remaining acid. Overnight, let the floor dry.
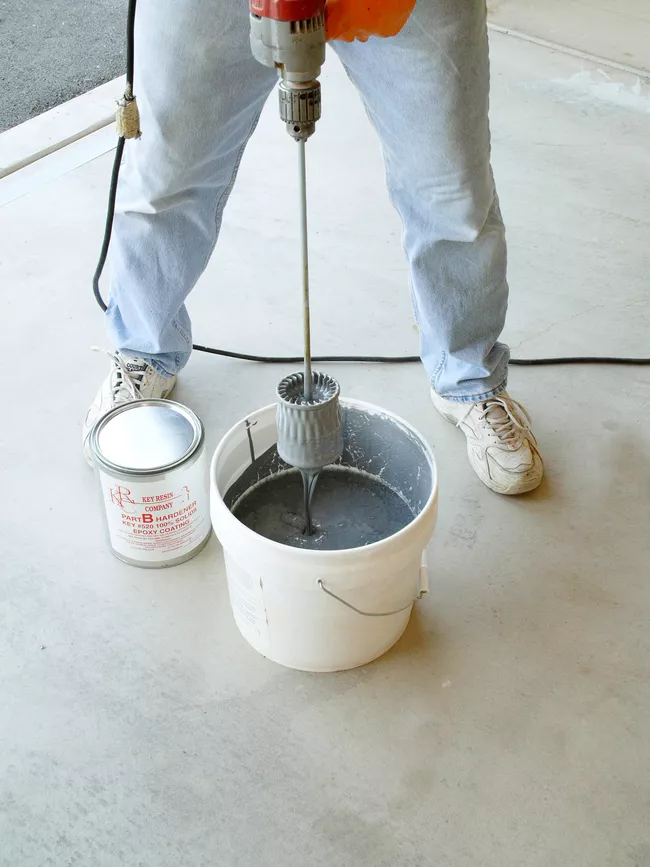
Mixing Epoxy Coating in Step 5
Use a drill and stirring bit as directed by the manufacturer to combine the two epoxy solutions. Pour the mixture into a second bucket and power-mix the paint once more to ensure thorough blending.
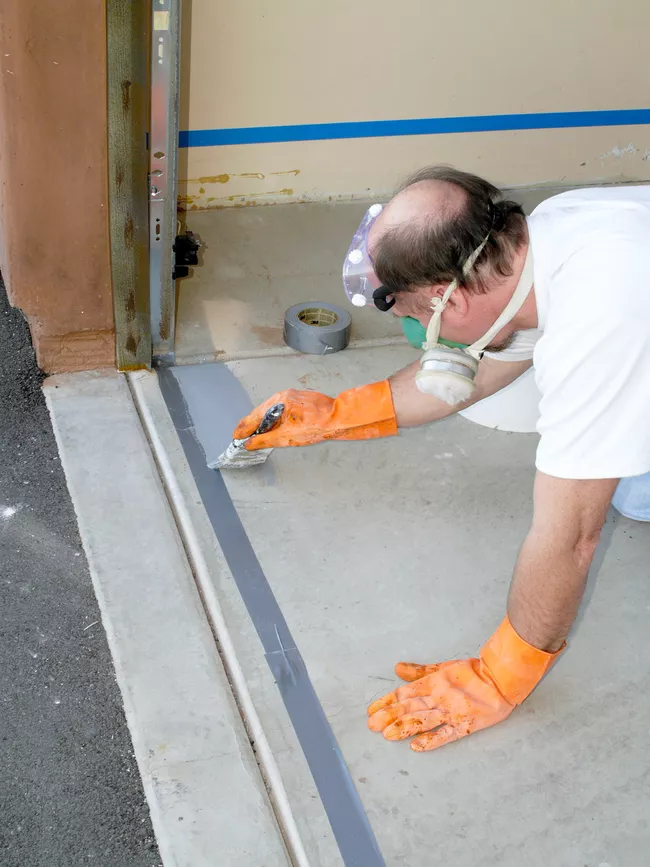
Apply Around the Periphery in Step 6
Start coating the garage’s exterior with epoxy coating. Tape the region directly below the garage door with duct tape. Apply epoxy in a 4-inch strip along the garage walls and in opposition to the tape.
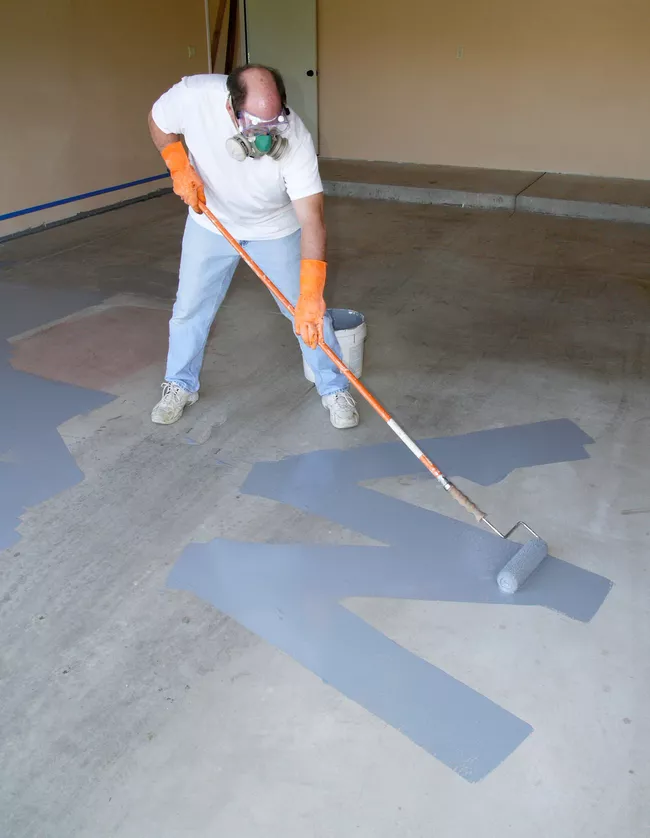
Roll on epoxy in step 7
Paint the floor with a medium-nap, 9-inch wide roller. Add a pole to the roller. After that, only the bottom half of the roller should cover by the epoxy in the bucket. (This evenly distributes the epoxy in the roller.) Apply epoxy to the garage floor in a broad “W” pattern, working within a 4-foot square area. To finish the pattern and erase any roller traces, backroll. As you transition from one section to the next, make sure the edges are still wet to prevent visible seams from forming. As directe by the manufacturer, let the first coat dry.
Apply a Second Coat in Step 8
For the second coat of epoxy, if you don’t want a glossy floor (because they are slippery when wet), mix in a non-skid floor coating. Use the drill’s stirring bit to stir. Revisit Step 7 If you want to add color flakes, do so sparingly while the area is still wet. Continue adding flakes until the pattern you want achieve.
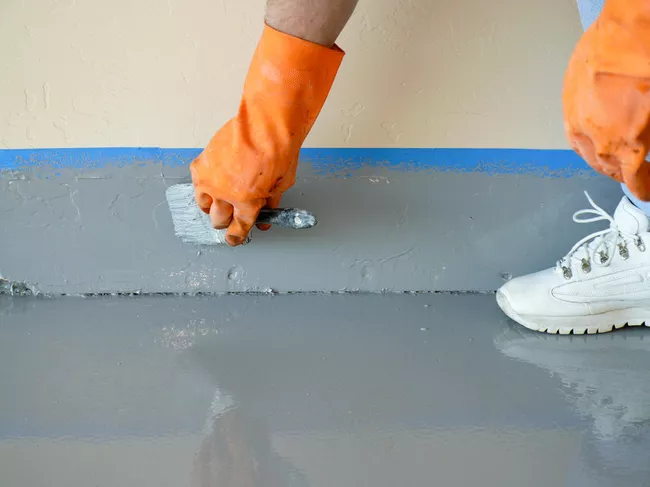
Step 9: Complete Your Epoxy Floors
Mask off the wall of the garage or basement and paint it with the epoxy mixture use on the floor’s bottom 4 inches. This border creates a unife appearance and serves as a baseboard for protection.
How to Take Care of Epoxy Flooring
Clean up any debris with a vacuum or broom, wipe up spills right away with a soft cloth, and deep-clean soiled floors by mopping them with a solution of half cup of ammonia to a gallon of water. Use a kitchen scrubbing pad and hot water to gently scrub away rust stains; never use an abrasive cleaner, acids, or chemicals on epoxy-coated floors.
FAQ
Does the garage floor need to be sealed before epoxy?
The short answer is: Yes, even freshly laid concrete must etch before epoxy or a comparable garage floor coating is applied. Etching is a step in the process of preparing concrete. The most crucial step is actually proper concrete preparation before a coating is applied.
How thick should an epoxy floor be?
Standard epoxy floor coatings and resinous systems can install in heavy-duty situations at thicknesses of 0.375 inches (375 mils or 3/8″) or more. These frequently contain different types of reinforcing aggregates or powders, which apply after particular grout coats and topcoats.
How is concrete prepared for epoxy?
A smooth floor will not allow the epoxy to adhere well, so you must etch, acid wash, or grind the floor to complete the preparation of an uncoated concrete floor. You can abrasively prepare the surface by renting a sandblaster or diamond grinder. Alternatively, you could use a product made for preparing concrete floors to etch or acid wash the floor.
Does the concrete need to be primed before epoxy?
Applying an epoxy floor primer before coating your flooring has a number of advantages: Because epoxy primers are thin, they offer better adhesion by penetrating the concrete substrate and improving the bond. In situations where thicker epoxy base coats use, primers offer a better chemical bond.